

How to share
Prerequisites- Your workspace role is Admin, Builder, Member, or Member All Accounts. Viewer and Integration Admin can’t grant or revoke external access.
- The item is a project or a document. Both expose a Share button in the header.
- Open the project or document you want to share.
- Open the Share dialog. For a project, turn on Share externally — this enables customer access and unlocks the sharing controls. (Turning it off later cuts customer access even if grants remain.)
- Enter either an email address (e.g.
jordan@acme.com) or a domain (e.g.acme.com). - Click Share. The recipient can now open the share link and view the item.
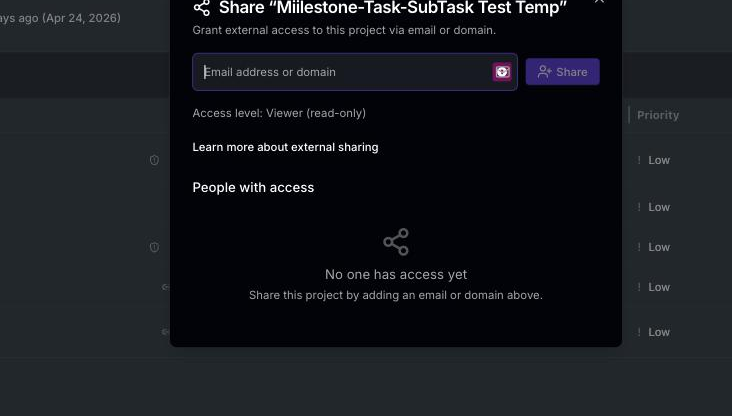 Recipients you add by email are notified automatically. For domain shares, copy the link from the share dialog and send it to them yourself.
One-click share with your company domains
If your workspace has Company Domains configured (the same set that decides who counts as internal versus external), the share dialog shows a Make available to<your-domain.com> checkbox under the email or domain input. Ticking it grants Viewer access to every configured company domain in one click, so anyone with a matching work email can open the share link without needing a workspace seat. Unticking it revokes those same domain grants. Revoking a company domain from People with access further down the dialog also un-ticks the box, so its state always matches what’s actually granted.
The checkbox is only shown when the workspace has at least one Company Domain configured and Share externally is on. Only Admins can toggle it. Non-admins see the checkbox but get a failure toast if they try.
Shared links are not anonymous. Every recipient signs in before they can view anything.
What recipients experience
The first-time experience depends on how you shared:
Why the difference? When you share with a specific email, we provision that person’s access ahead of time, so they only ever need to sign in. A domain share can’t be provisioned for one person — any address at the domain may use it — so each new recipient creates an account on first use.
What’s visible on a shared project
You control what a recipient sees, per project (or project template):- Fields — in Customize → Edit field visibility, a field is either on the project (listed in the dialog) or removed, and each listed field is either Internal Only or shared with the recipient. See Choosing what’s visible and shared below.
- Tasks & milestones — open a task in the task drawer and use the visibility toggle to mark it Internal only or Shared Externally. Hiding a milestone also hides everything under it. See Choosing which tasks the customer sees below.
- Comments — post each comment as a Reply (visible to the recipient) or an Internal note (kept in the app).
Custom fields you’ve turned Share on appear on the shared link even if they don’t have a value yet — a shared task field shows as a column and a shared project field appears in the header, filled in or not.
Access level
Each external grant is scoped to the shared item only — it doesn’t give access to your workspace. External shares currently grant Viewer access:Viewer
Can view the shared item. This is the only access level available for external grants today.
Choosing what’s visible and shared
Open the project’s Customize (gear) menu and choose Edit field visibility. The dialog works on a simple rule: a field is either on the project or it isn’t.- Listed fields are shown in your internal project view, task table, and task drawer. Click a field’s ✕ to remove it — a removed field disappears both from your internal views and from anything shared with the customer.
- Use the + button to add a field back (or add a new one). The picker offers Standard fields you’ve removed and the full Custom fields catalog — any custom field in your workspace can be put on projects or project tasks.
- Each listed field has one checkbox: Internal Only. Checked (the default for newly added custom fields) keeps the field out of the customer portal; uncheck it to share the field on the shared link.
- Fields are grouped into Project and Task tabs and configured independently — the task Status setting does not affect the project Status. Use the search box to find a field quickly.
- Title is always on and always shared — it’s the only field you can’t remove or change.
- On the shared link, the standard task fields a recipient can see are Title, Status, Due date and Assignee; the standard project fields are Title, Status and Due date. Other standard fields (Description, Start date, Priority, Account, Type, Tags, Created At…) are internal-only for now, so their checkbox is locked.
- Some custom field types can’t be shared: lookup fields, list fields (lookup list / text list), and object/JSON fields are not supported on the shared link or customer portal. Their rows show Internal Only checked and locked. All other types — text, number, currency, percent, date, checkbox, picklist — can be shared.
- The same dialog is available on project templates (the tabs read Project Template / Task), and a project created from a template inherits the template’s field setup.
Removing a field never deletes data — values stay on the tasks and come back when you re-add the field. Internal Only only affects external viewers; every listed field is always visible to your team. Removing a required custom field also removes its check: creating a task no longer prompts for required fields that aren’t on the project.
Choosing which tasks the customer sees
You hide tasks and milestones from the task drawer:- Open the task or milestone from the project task table. The task drawer opens.
- In the drawer’s header, next to the field-order gear, click the eye icon to toggle the task’s visibility. The icon reads Shared Externally (eye) when the customer can see the task and Internal only (eye-off) when they can’t.
- Click it again to switch back. Changes apply to the customer portal immediately; your team still sees the task as usual.
The drawer toggle only appears on projects that are shared externally, and only for saved tasks — it’s never shown on the shared link itself, and external viewers can’t tell that anything is hidden.
Task visibility on project templates
Project templates support the same controls. Open a template task in its drawer and use the same Internal only / Shared Externally toggle (subtasks follow their parent here too), and the template’s task table shows the same read-only eye-off marker on internal-only tasks. On a template the toggle is always available — no external sharing required — because it decides what’s hidden in projects created from the template once those projects are shared.Sharing comments
On a shared project, comments can be kept internal or shared with the customer:- Each comment has a Share externally toggle. Off (the default) keeps it internal to your team; on shares it with the customer through the portal.
- The toggle only appears once the project is shared externally — on an unshared project every comment is internal.
- Comments the customer posts from the portal are always shared.
- Whoever writes a comment, and anyone @mentioned in it, is automatically added as a follower so they’re notified of future activity. They can unfollow at any time.
External viewers only ever see comments that were shared with the customer — internal comments are filtered out of the portal.
Managing and revoking access
Open the Share dialog again to see everyone who currently has access. From there you can revoke access or copy a recipient’s share link. Revoking takes effect on the recipient’s next sign-in; an already-open session may persist briefly until it expires.Notes
- Public email providers (e.g.
gmail.com,outlook.com) can’t be used as a domain grant — add those people as individual email grants instead. - Sharing works for both projects and documents.