> ## Documentation Index
> Fetch the complete documentation index at: https://help.statisfy.com/llms.txt
> Use this file to discover all available pages before exploring further.
# Digital Worker Slack
> Connect Slack, map customer channels to accounts, and let a Digital Worker reply to customers in Slack — autonomously or with a human in the loop.
**Preview feature.** Digital Workers are available to a limited set of workspaces while we refine them. If you don't see **Digital Workers** in your navigation, it isn't turned on for your account yet — contact your administrator or [Statisfy support](mailto:support@statisfy.com) to request access.
A Digital Worker can reply to customers in Slack. When a customer posts in a channel the worker watches, the worker either answers in-thread on its own or drafts a reply and holds it for a teammate to review and send. This guide walks through connecting Slack, adding the app to your channels, mapping each channel to a customer account, enabling the surface on a worker, and how replies are sent and reviewed.
### How it works
1. The **Statisfy** Slack app is added to your customer channels.
2. Each channel is **linked to a customer account** (on the account's settings).
3. When a customer posts and no teammate is already handling the thread, the worker assigned to that customer replies in-thread — or holds a draft in the **worker pool** for a teammate to send.
## Step 1 — Connect the Slack workspace
Connect Slack once, at the workspace level. Go to **Integrations → Admin Apps**, find **Slack**, and click **Connect**.
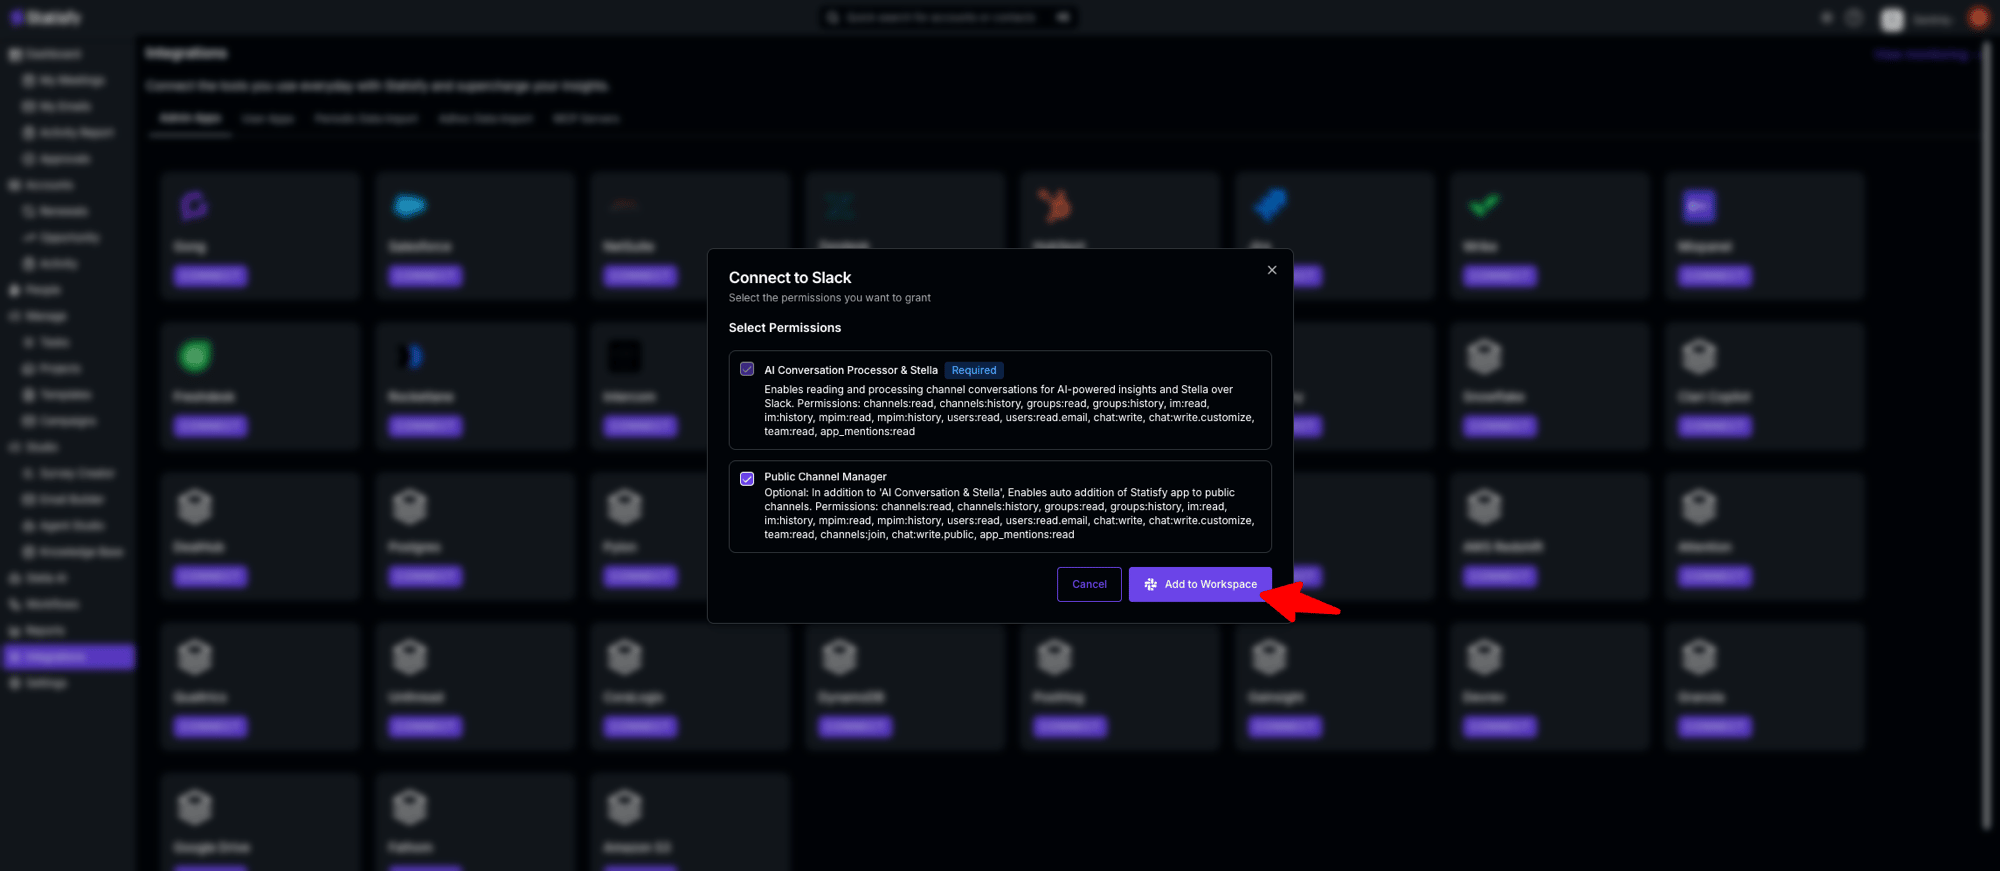
In the **Connect to Slack** dialog, choose the permissions to grant:
* **AI Conversation Processor & Stella** *(required)* — lets the worker read and reply in channels. This bundle includes `chat:write.customize`, which is what lets replies post under a custom name and avatar.
* **Public Channel Manager** *(optional)* — adds the ability to auto-join public channels (used by the auto-join setting later).
Click **Add to Workspace**.
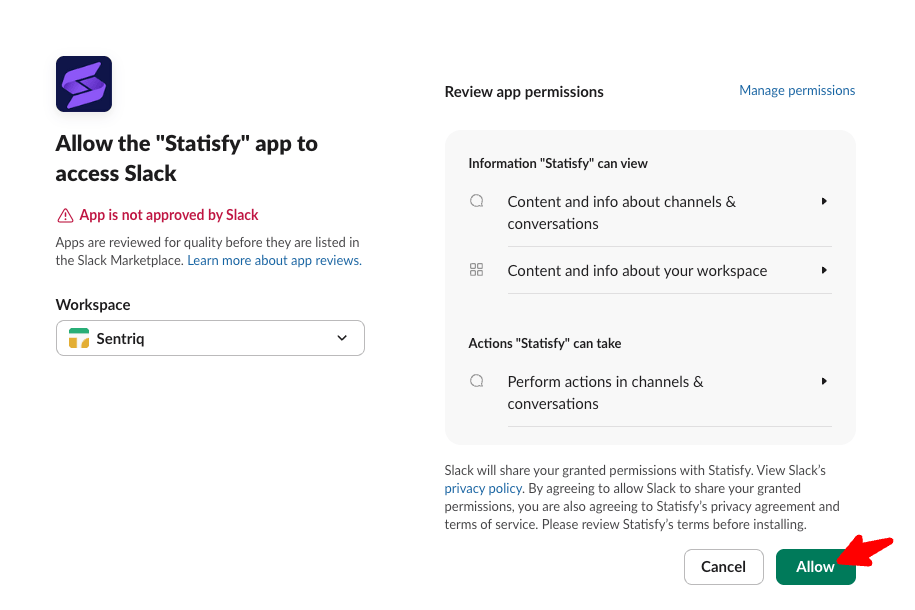
 Slack then asks you to authorize the app — review the permissions and click **Allow**.
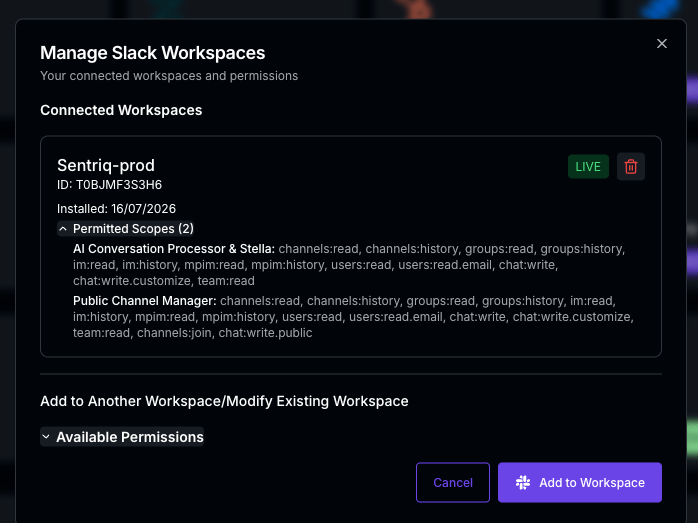
 Back in Statisfy, the workspace shows as **LIVE** under **Manage Slack Workspaces**, with the scopes it was granted.
 ## Step 2 — Add Statisfy to each customer channel
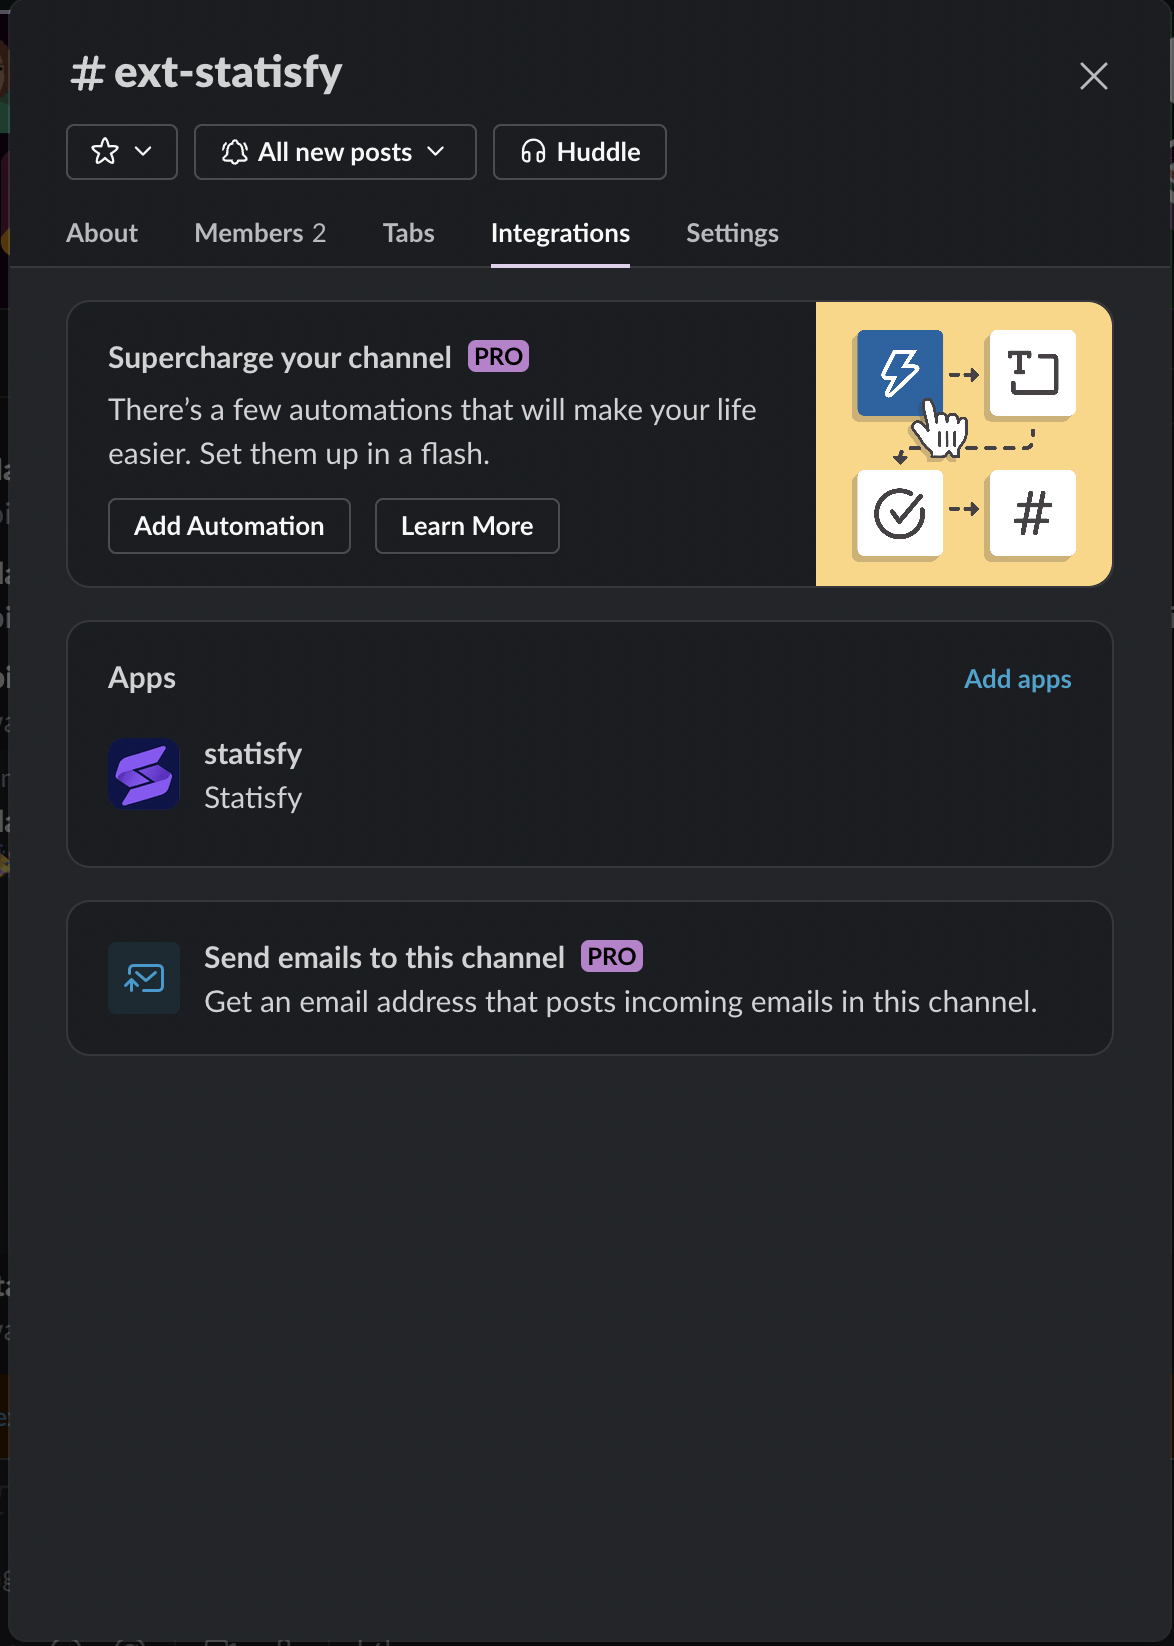
The worker can only see and reply in channels the Statisfy app has joined. In Slack, open the channel, go to the channel name → **Integrations** tab, then under **Apps** click **Add apps** and choose **Statisfy** (or type `/invite` and add the Statisfy app).
## Step 2 — Add Statisfy to each customer channel
The worker can only see and reply in channels the Statisfy app has joined. In Slack, open the channel, go to the channel name → **Integrations** tab, then under **Apps** click **Add apps** and choose **Statisfy** (or type `/invite` and add the Statisfy app).
 ## Step 3 — Map each channel to a customer account
So the worker knows which customer a channel belongs to, link the channel on that customer's account:
1. Open the customer's account and click the **settings gear** (next to the account name).
2. Under **Current Channels (To extract engagement data)**, use **Add Channel** to add the Slack channel name (for example, `ext-statisfy`), then **Save**.
## Step 3 — Map each channel to a customer account
So the worker knows which customer a channel belongs to, link the channel on that customer's account:
1. Open the customer's account and click the **settings gear** (next to the account name).
2. Under **Current Channels (To extract engagement data)**, use **Add Channel** to add the Slack channel name (for example, `ext-statisfy`), then **Save**.
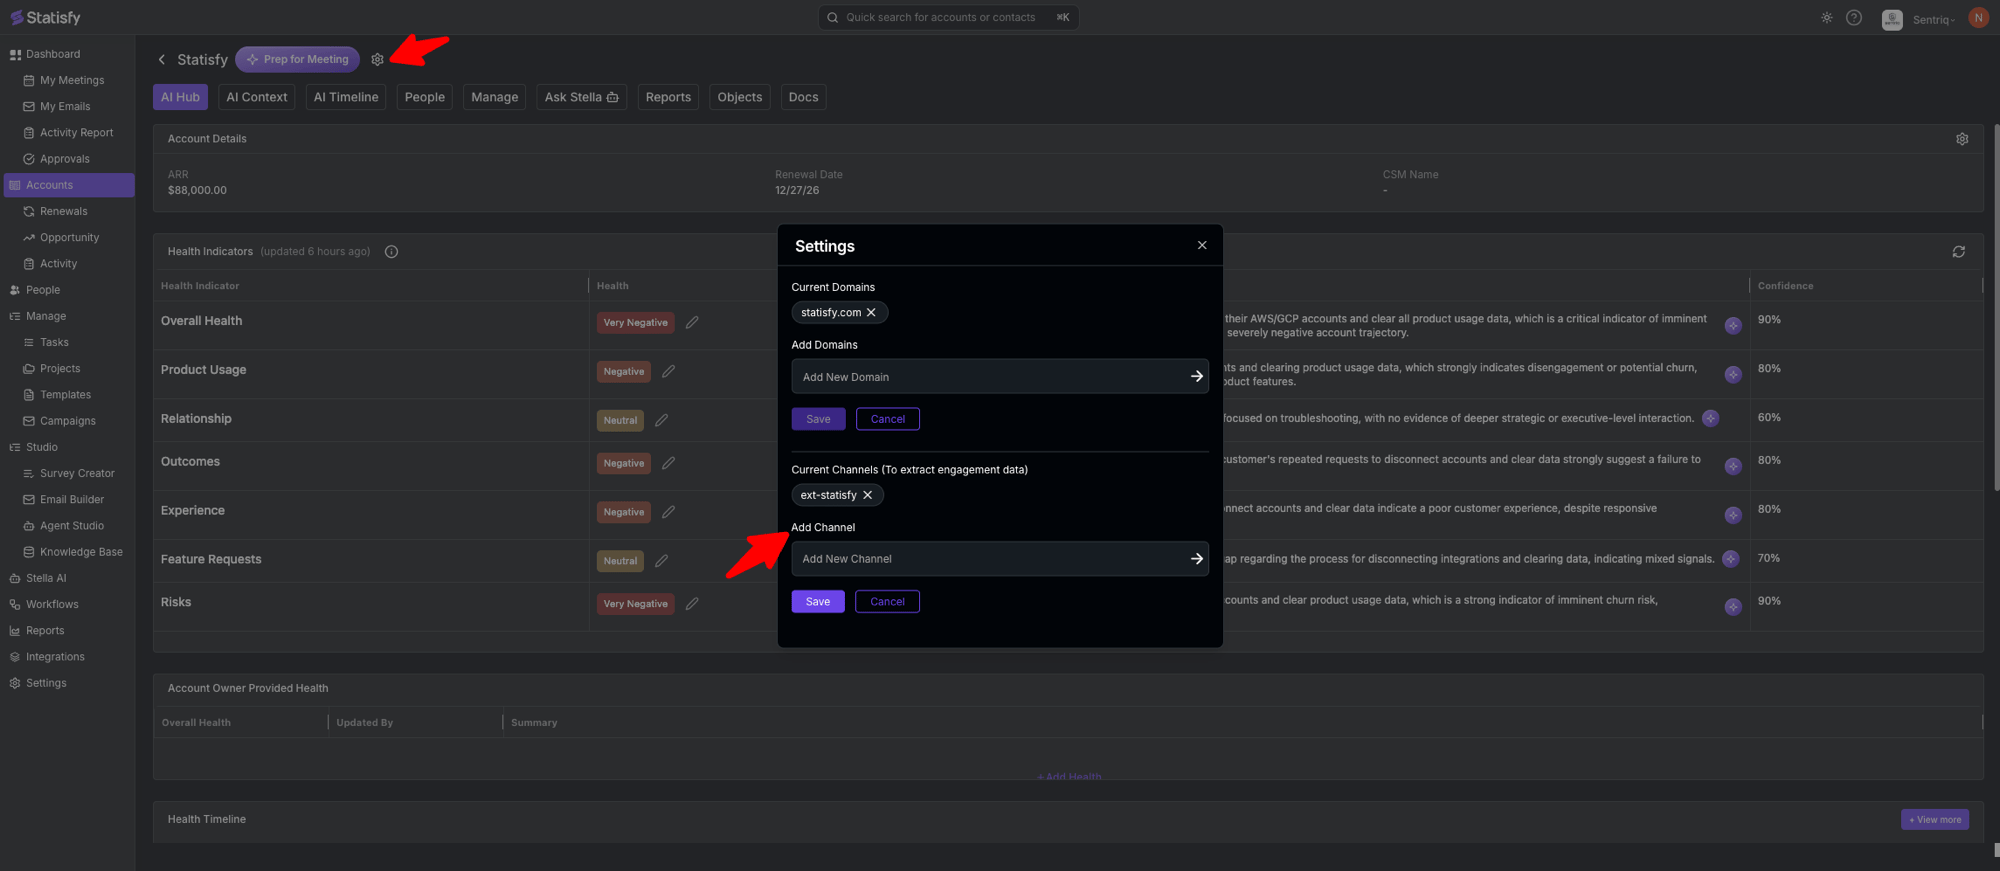 The worker uses this mapping to tie the channel's conversations to that account. You can add more than one channel, and you manage the account's domains from the same dialog.
## Step 4 — Enable the Slack surface on the worker
1. Open **Digital Workers** and select your worker.
2. On the **Slack** tab, turn on **Enable Slack surface**.
3. Set the worker's **Name** and **Avatar** in the **Identity** section (on the **Overview** tab) — this is the identity the worker uses when it replies on its own.
The worker uses this mapping to tie the channel's conversations to that account. You can add more than one channel, and you manage the account's domains from the same dialog.
## Step 4 — Enable the Slack surface on the worker
1. Open **Digital Workers** and select your worker.
2. On the **Slack** tab, turn on **Enable Slack surface**.
3. Set the worker's **Name** and **Avatar** in the **Identity** section (on the **Overview** tab) — this is the identity the worker uses when it replies on its own.
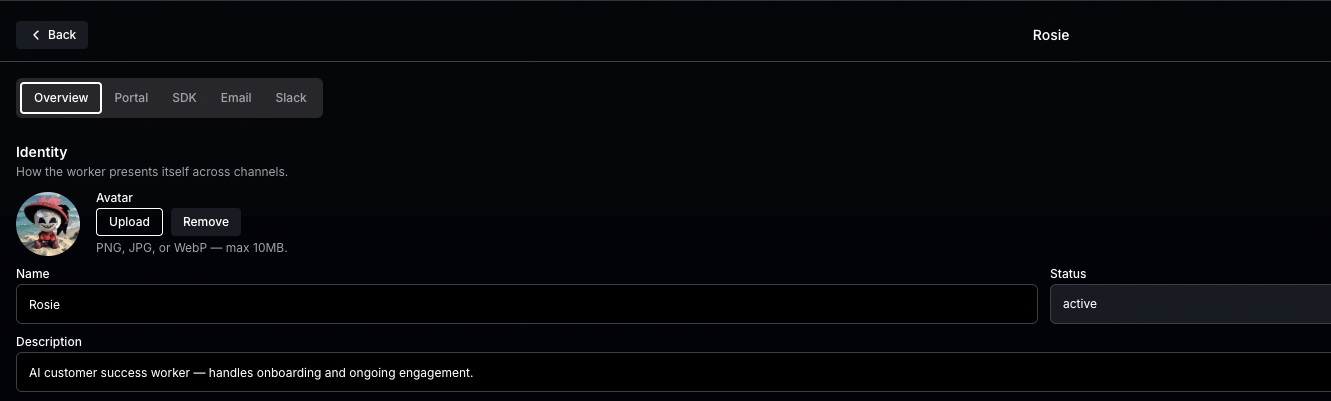 The Slack tab also shows the workspace-wide **auto-join** setting (the same one as **Settings → Slack**) — for example, auto-join channels whose name begins with a prefix like `ext-`.
If **Enable Slack surface** is disabled, Slack isn't connected yet — finish Step 1 first.
## How replies are sent — autonomous vs. human-in-the-loop
When the worker drafts a reply, one of two things happens depending on its autonomy:
* **Autonomous** — the worker sends the reply itself, in-thread.
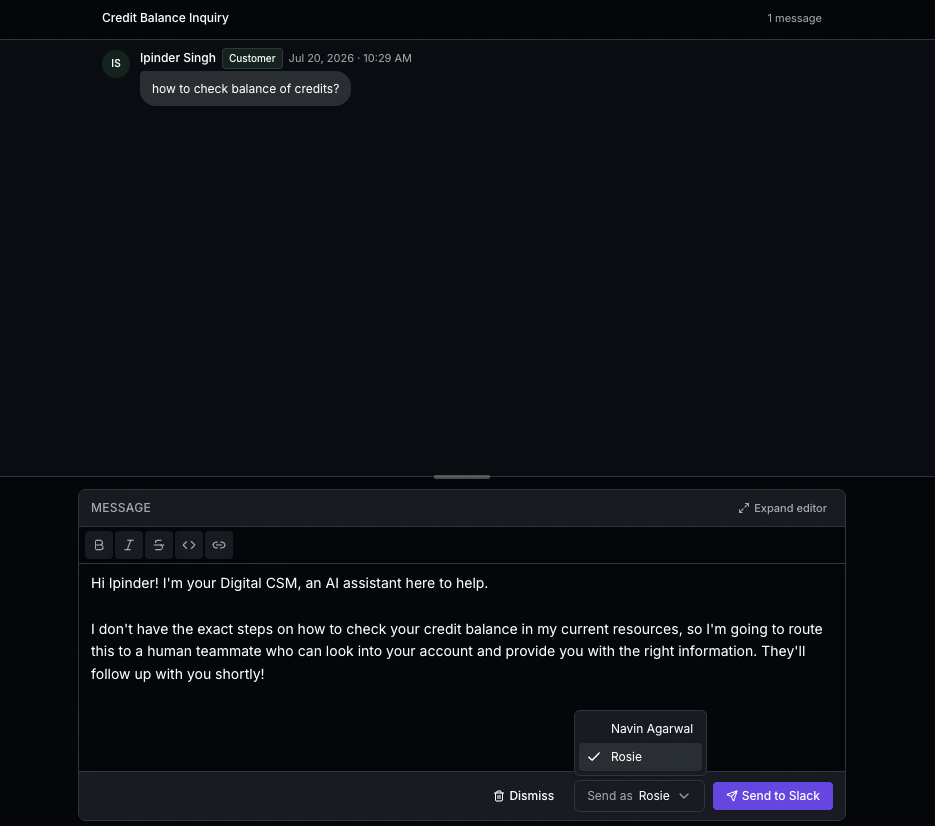
* **Human-in-the-loop (HIL)** — the worker drafts the reply but **holds it for a person**. The conversation shows up in the **worker pool** with status **NEEDS RESPONSE**. A teammate opens it, edits the draft if needed, chooses who to send as, and clicks **Send to Slack**.
The Slack tab also shows the workspace-wide **auto-join** setting (the same one as **Settings → Slack**) — for example, auto-join channels whose name begins with a prefix like `ext-`.
If **Enable Slack surface** is disabled, Slack isn't connected yet — finish Step 1 first.
## How replies are sent — autonomous vs. human-in-the-loop
When the worker drafts a reply, one of two things happens depending on its autonomy:
* **Autonomous** — the worker sends the reply itself, in-thread.
* **Human-in-the-loop (HIL)** — the worker drafts the reply but **holds it for a person**. The conversation shows up in the **worker pool** with status **NEEDS RESPONSE**. A teammate opens it, edits the draft if needed, chooses who to send as, and clicks **Send to Slack**.
 ## Who a reply appears as
Replies use the `chat:write.customize` permission (granted in Step 1) to post under a custom name and avatar. Who they appear as depends on the path:
* **Autonomous reply** → posts under the **worker's own Name and avatar** (from the Identity section).
## Who a reply appears as
Replies use the `chat:write.customize` permission (granted in Step 1) to post under a custom name and avatar. Who they appear as depends on the path:
* **Autonomous reply** → posts under the **worker's own Name and avatar** (from the Identity section).
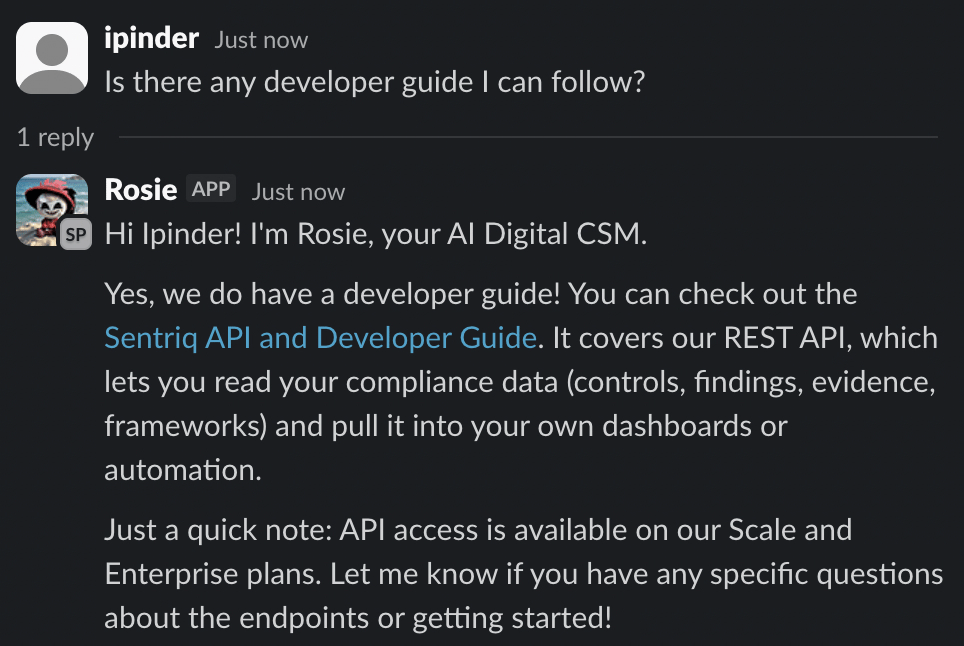 * **Teammate-sent reply** → posts under **that teammate's own Slack name and profile picture by default**. The **Send as** dropdown in the worker pool lets them switch between themselves and the worker before sending.
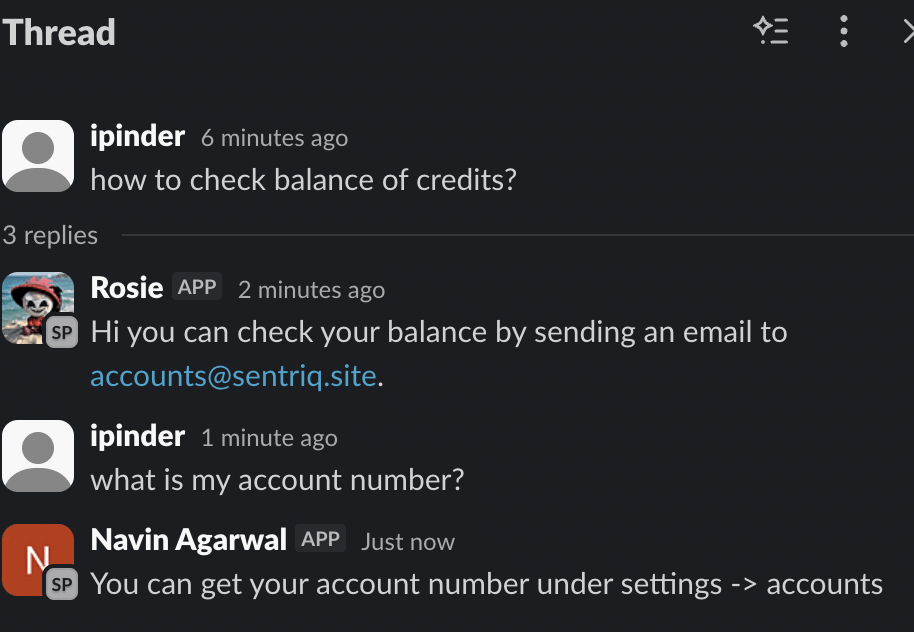 Both custom identities require the Slack app to have `chat:write.customize` (the **AI Conversation Processor & Stella** scope). Without it, replies post under the Slack app's default name and avatar. If replies aren't showing the right identity, reconnect Slack from the worker's Slack tab (**Reconnect Slack** — a re-authorization, not a disconnect, so the bot stays in your channels).
## Watch conversations in the worker pool
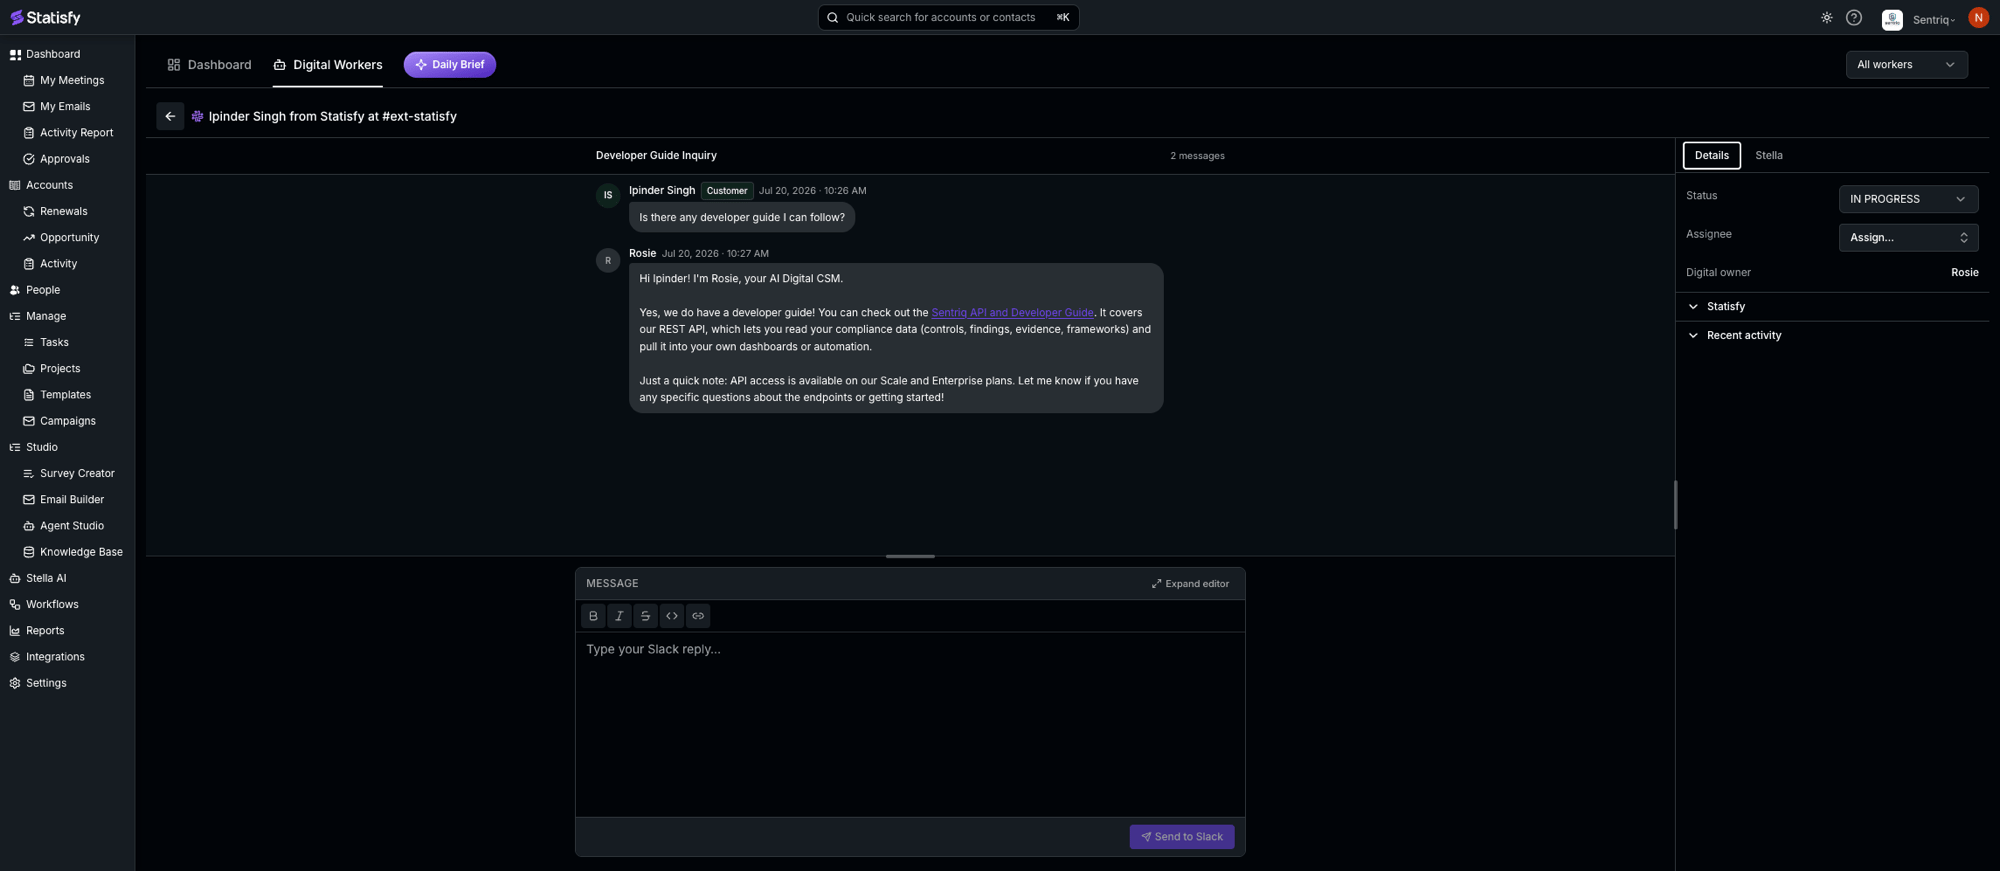
To see every conversation your Digital Workers are managing, open the **Digital Workers** tab in the top navigation (next to **Dashboard**) — this is your **worker pool**.
"Digital Workers" names two places: the **builder** where you configure a worker (Step 4), and the **Digital Workers** tab in the top navigation — the **worker pool** described here.
The pool lists conversations across every channel a worker handles. Open one to read the thread and see its details on the right — **Status** (for example, **NEEDS RESPONSE** when a reply is waiting on a human, **IN PROGRESS**, **ON HOLD**, or **CLOSED**), **Assignee**, and the **Digital owner** (the worker). Use the **All workers / My workers** selector to scope the list. This is also where held replies are reviewed and sent (see above).
Conversation statuses come from a configurable **Conversation** status template. Admins can rename statuses, change their colors, or add new ones under **Settings → Manage status templates**.
Both custom identities require the Slack app to have `chat:write.customize` (the **AI Conversation Processor & Stella** scope). Without it, replies post under the Slack app's default name and avatar. If replies aren't showing the right identity, reconnect Slack from the worker's Slack tab (**Reconnect Slack** — a re-authorization, not a disconnect, so the bot stays in your channels).
## Watch conversations in the worker pool
To see every conversation your Digital Workers are managing, open the **Digital Workers** tab in the top navigation (next to **Dashboard**) — this is your **worker pool**.
"Digital Workers" names two places: the **builder** where you configure a worker (Step 4), and the **Digital Workers** tab in the top navigation — the **worker pool** described here.
The pool lists conversations across every channel a worker handles. Open one to read the thread and see its details on the right — **Status** (for example, **NEEDS RESPONSE** when a reply is waiting on a human, **IN PROGRESS**, **ON HOLD**, or **CLOSED**), **Assignee**, and the **Digital owner** (the worker). Use the **All workers / My workers** selector to scope the list. This is also where held replies are reviewed and sent (see above).
Conversation statuses come from a configurable **Conversation** status template. Admins can rename statuses, change their colors, or add new ones under **Settings → Manage status templates**.
 ## Test it
1. Pick a customer channel that has the Statisfy app added (Step 2), is mapped to an account (Step 3), and has a worker assigned.
2. Have someone external (a customer-side participant) post a message in the channel.
3. The worker replies in-thread under its own name and avatar if it sends autonomously — or the conversation appears in the worker pool as **NEEDS RESPONSE** for a teammate to review and send (under their own name by default; switchable via **Send as**).
4. Open the **Digital Workers** tab (worker pool) to watch the conversation and its status.
## Troubleshooting
Slack isn't connected. Connect it in **Integrations → Admin Apps → Slack** (Step 1), then return to the worker's Slack tab.
Your install doesn't have the custom-sender permission. In the worker's Slack tab, click **Reconnect Slack** to grant the **AI Conversation Processor & Stella** scope (this re-authorizes without removing the bot from your channels).
That's expected when a teammate **sends a held draft from the worker pool** — it posts under their own Slack name and picture by default. To post as the worker instead, switch the **Send as** dropdown to the worker before sending. Fully autonomous replies always post as the worker.
* Is the **Statisfy** app added to that channel (Step 2)?
* Is the channel **mapped to a customer account** on the account's settings (Step 3)?
* Is the worker **active** and **assigned** to that customer's accounts?
* Was the message from an **external** participant? The worker ignores internal senders and threads a teammate is already handling.
## Related
The full Statisfy Slack app — sentiment, Stella, and notifications.
Have a worker scan mailboxes or handle forwarded support email.
## Test it
1. Pick a customer channel that has the Statisfy app added (Step 2), is mapped to an account (Step 3), and has a worker assigned.
2. Have someone external (a customer-side participant) post a message in the channel.
3. The worker replies in-thread under its own name and avatar if it sends autonomously — or the conversation appears in the worker pool as **NEEDS RESPONSE** for a teammate to review and send (under their own name by default; switchable via **Send as**).
4. Open the **Digital Workers** tab (worker pool) to watch the conversation and its status.
## Troubleshooting
Slack isn't connected. Connect it in **Integrations → Admin Apps → Slack** (Step 1), then return to the worker's Slack tab.
Your install doesn't have the custom-sender permission. In the worker's Slack tab, click **Reconnect Slack** to grant the **AI Conversation Processor & Stella** scope (this re-authorizes without removing the bot from your channels).
That's expected when a teammate **sends a held draft from the worker pool** — it posts under their own Slack name and picture by default. To post as the worker instead, switch the **Send as** dropdown to the worker before sending. Fully autonomous replies always post as the worker.
* Is the **Statisfy** app added to that channel (Step 2)?
* Is the channel **mapped to a customer account** on the account's settings (Step 3)?
* Is the worker **active** and **assigned** to that customer's accounts?
* Was the message from an **external** participant? The worker ignores internal senders and threads a teammate is already handling.
## Related
The full Statisfy Slack app — sentiment, Stella, and notifications.
Have a worker scan mailboxes or handle forwarded support email.